Discovering a puddle beneath your beloved espresso machine can transform your morning ritual into a frustrating mess. A leaking espresso machine not only wastes precious coffee and water but also indicates a deeper issue that could impact the quality of your brew. While the sight of escaping water might initially spark panic, many common leaks are surprisingly simple to diagnose and fix right at home, saving you costly repair bills and getting you back to brewing delicious espresso in no time. This guide will walk you through identifying the source of the leak, providing step-by-step instructions for common DIY repairs, and sharing essential maintenance tips to keep your machine running smoothly and leak-free.
Why Your Espresso Machine Is Leaking: Common Causes Explained
An espresso machine operates under significant pressure and heat, and over time, various components can wear down, leading to leaks. Understanding the common culprits is the first step in effective troubleshooting. Sometimes, what appears to be a leak is simply a design function or user oversight. For instance, an overflowing drip tray or normal condensation after brewing or backflushing can create puddles that resemble a leak. Always check if the drip tray is full or if the machine is just releasing pressure as designed before assuming a major malfunction. However, persistent dripping from specific areas or puddles forming when the machine is idle usually points to a genuine issue, often related to worn seals, mineral buildup, or loose connections.
Essential Tools and Safety First for DIY Repairs
Before attempting any repairs on your espresso machine, prioritize safety. Always unplug your machine from the power outlet and allow it to cool completely. Water and electricity are a dangerous combination, and internal components can remain hot for a while. Having the right tools on hand will make the repair process smoother and prevent potential damage.
- Flathead screwdriver or specialized gasket removal tool: For prying out old gaskets.
- Stiff brush and cleaning cloths: To clean coffee residue and debris.
- Food-grade lubricant: For new O-rings and seals.
- Replacement parts: Such as new group head gaskets, O-rings for water tanks or steam wands, and descaling solution.
- Paper towels: Excellent for pinpointing the exact source of a leak.
- Flashlight: To inspect internal areas.
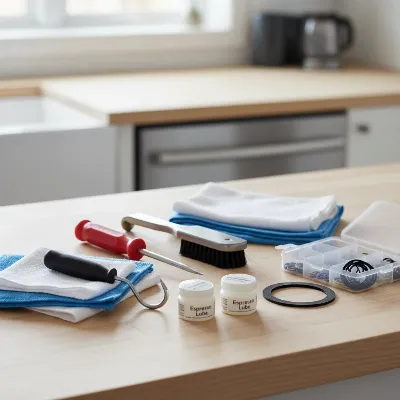 Various tools for home espresso machine repair, including screwdrivers, brushes, and replacement gaskets on a workbench
Step-by-Step Guide to Troubleshooting and Repairing Leaks
Identifying the precise location of the leak is crucial for effective repair. Each area of your espresso machine has specific components prone to wear.
Leaks from the Group Head or Portafilter
Leaks from around the portafilter during brewing are among the most common issues and usually indicate a problem with the group head’s sealing mechanism.
Worn Group Head Gasket: This rubber ring creates a tight seal between the portafilter and the group head. Over time, heat and pressure cause it to harden, crack, and lose elasticity, leading to water spraying or dripping from the sides of the portafilter.
- Signs: Water leaks during brewing, difficulty locking the portafilter into place, or the portafilter handle rotating further to the right than usual.
- Repair:
- Turn off and cool down: Ensure the machine is unplugged and completely cool.
- Remove shower screen and old gasket: Detach the portafilter. If your machine has a removable shower screen (often held by a screw), remove it. Use a flathead screwdriver or gasket removal tool to gently pry out the old, brittle gasket. Be patient, as it might come out in pieces.
- Clean the group head area: Thoroughly clean the groove where the gasket sits, removing all coffee residue and mineral deposits with a brush and damp cloth. Any debris can prevent the new gasket from sealing properly.
- Install new gasket: Align the new gasket (smooth side typically faces down) and press it firmly into place with your fingers. You can use an empty portafilter to help seat it by locking and unlocking it a few times.
- Reattach shower screen: If removed, reinstall the clean shower screen and its screw, tightening it until snug but not overtightening.
- Test: Run a shot without coffee to check for leaks.
Dirty Gasket/Shower Screen: Accumulated coffee grounds or oils on the gasket or shower screen can prevent a proper seal.
- Repair: Regular cleaning with a group head brush after each use and backflushing with espresso machine cleaner (if supported by your machine) can resolve this.
Overdosed Portafilter/Improper Seating: If you use too much coffee, the tamped puck can press against the shower screen, preventing the portafilter from fully locking in, creating a gap for water to escape.
- Repair: Reduce your coffee dose slightly and ensure the portafilter is locked in firmly and evenly.
|
Our Picks for the Best Espresso Machine in 2026
As an Amazon Associate I earn from qualifying purchases.
|
||
| Num | Product | Action |
|---|---|---|
| 1 | Espresso Machine, 20 BAR Pump Temperature Control, Compact Espresso Maker with Steam Milk Frother, Professional Coffee Makers for Home, Cappuccino, Latte, Gifts for Coffee Lover, Black |

|
| 2 | Chefman CraftBrew Espresso Machine, 15-Bar Pump Digital Espresso Maker w/Steam Wand for Latte & Cappuccino, Compact Espresso Coffee Machine w/ 1.5L Removable Water Reservoir - Stainless Black |
|
| 3 | Breville Barista Touch Espresso Machine BES880BSS, Brushed Stainless Steel |
|
| 4 | Gevi Commercial Espresso and Coffee Makers, Professional 20 Bar Espresso Maker with Milk Frother, Stainless Steel Expresso Coffee Machines for Home, Compact Cappuccino Machine, Great Gift |
|
| 5 | Espresso Machine 20 Bar with Milk Frother, Stainless Steel Coffee Maker with 42 oz Removable Water Tank for Cappuccino, Latte&Cold Brew, Home&Office, Silver |
|
| 6 | 20 Bar Espresso Coffee Machine with LED Touch Screen, Espresso Maker with Self-Cleaning Function & Milk Frother, Compact Cappuccino & Latte Maker for Home and Office |
|
| 7 | SHARDOR Espresso Machine 20 Bar, Professional Espresso Machine with Milk Frother and Touchscreen, Expresso Coffee Machines with Adjustable Temperature,for Cappuccino, Latte |
|
| 8 | Espresso Machine with Milk Frother, 20 Bar Pressure Espresso Maker, with 44OZ Removable Tank, Compact Stainless Steel Coffee Machine for Home, Office, Latte, Cappuccino, Gift for Women or Men |
|
| 9 | 20Bar Espresso Machine, Compact Espresso Maker with Milk Frother, Stainless Steel Coffee Machine for Cappuccino&Latte, 42oz Water Tank, Visible Pressure Gauge, Home&Office, Silver |
|
| 10 | Espresso Machine, 20Bar Compact Stainless Espresso Maker, With Milk Frother Steam Wand, 57.5OZ Removable Water Tank, Displays Making Time & Water Temperature, Cold Brew & Cappuccino, Silver |
|
Leaks from the Water Tank or Reservoir
Leaks from the water tank often manifest as puddles forming underneath the machine, especially when it’s not in use.
Cracked Tank: Plastic water tanks can develop hairline cracks over time or due to accidental drops.
- Inspection: Remove the tank, fill it with water, and hold it over a sink to check for drips.
- Repair: A cracked tank usually requires replacement.
Worn Tank Seal (O-ring): A rubber O-ring or seal at the bottom of the water tank, where it connects to the machine, can wear out or become brittle.
- Repair:
- Empty and remove tank: Ensure the machine is unplugged.
- Inspect seal: Locate the O-ring or seal at the bottom connection point of the tank. If it looks worn, cracked, or is missing, it needs replacement.
- Replace seal: Carefully remove the old seal. Clean the area. Install a new food-grade silicone O-ring, ensuring it sits properly. A thin layer of food-grade lubricant can aid in seating.
- Reseat tank: Place the water tank back into the machine, ensuring it’s properly aligned and seated securely.
Leaks from the Steam Wand
A dripping or sputtering steam wand can be annoying and affect milk frothing quality.
Clogged Steam Tip: Dried milk residue can block the small holes in the steam wand tip, causing pressure buildup and leaks.
- Repair:
- Unscrew tip: Most steam tips can be unscrewed by hand or with a small wrench.
- Soak and clean: Soak the tip in hot water with espresso machine cleaner. Use a paperclip or a dedicated tool to clear each hole.
Worn Internal Seals (O-rings/Gaskets): The internal valves and joints of the steam wand contain O-rings and gaskets that can degrade from constant heat and movement. Leaks from the pivot joint or around the steam knob often point to these.
- Repair: This typically requires disassembling the steam wand assembly to access and replace the worn O-rings. The specific steps vary significantly by machine model, so consult your machine’s manual or look for model-specific tutorials online. Apply food-grade lubricant to new O-rings before installation.
Scale Buildup: Limescale from hard water can accumulate inside the steam valve, preventing it from closing completely and causing drips.
- Repair: Descaling the machine is crucial. Follow your manufacturer’s instructions for descaling, ensuring the descaling solution is run through the steam wand as part of the process.
Loose Fittings/Overtightening Valve: Connections can loosen over time, or overtightening the steam knob can damage the internal seal.
- Repair: Check for any loose fittings around the wand and gently tighten them. Avoid forcing the steam knob shut; close it just enough to stop steam flow.
Leaks from Underneath the Machine
If water pools under the machine without a clear external source, the leak is likely internal. These repairs can be more complex and may require opening the machine’s casing.
Internal Hose Issues: The internal plumbing consists of silicone or plastic hoses that can crack, become loose from connections, or slip off due to pressure and vibration.
- Inspection: If you’re comfortable and it’s safe to open your machine (always unplugged and cooled), look for visible cracks, loose clamps, or disconnected hoses. A flashlight can help.
- Repair: Reattach loose hoses and secure them with clamps. If a hose is cracked, it will need to be replaced. Ensure replacement hoses are food-grade and rated for high pressure/temperature.
Internal Valve or Boiler Seals: Seals around the pump, boiler, or internal valves can fail, leading to leaks within the chassis.
- Inspection: Look for water dripping near these components.
- Repair: Replacing these seals can be more involved and may require specialized knowledge. If you’re unsure, it’s best to consult a professional technician.
Heating Element (Resistance) Cracks: In some machines, the heating element (resistance) itself can crack due to limescale buildup, causing an internal leak. This is a more serious issue and almost always requires professional service.
Preventing Future Leaks: Proactive Maintenance for Your Machine
Regular maintenance is your best defense against leaks and extends the lifespan of your espresso machine.
-
Regular Descaling: This is paramount, especially if you live in a hard water area. Descale your machine every 2-3 months with hard water or every 4-6 months with filtered water, using a manufacturer-approved descaling solution. This prevents limescale buildup that can clog valves and damage seals.
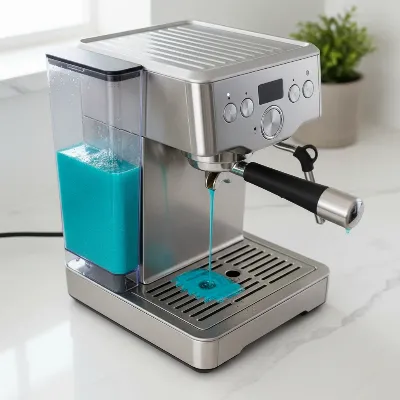 Espresso machine undergoing a descaling cycle, with descaling solution visible in the water tank, in a clean kitchen setting.
 -
Daily Cleaning Routine:
- Group Head and Portafilter: After every shot, purge the group head with hot water and brush away any coffee grounds. Rinse your portafilter and basket thoroughly.
- Steam Wand: Immediately after steaming milk, wipe the wand clean with a damp cloth and purge a short burst of steam to clear any internal milk residue.
- Drip Tray: Empty and clean the drip tray daily to prevent overflow and bacteria growth.
-
Gasket and Seal Inspection/Replacement: Regularly inspect your group head gasket and other visible seals for signs of wear. The group head gasket often needs replacement every 6-12 months, or more frequently with heavy use. Proactive replacement prevents leaks before they start.
-
Water Quality: Use filtered or softened water whenever possible. This significantly reduces mineral buildup inside your machine, protecting internal components and extending the life of seals.
-
Proper Usage: Avoid overfilling the water tank and handle the portafilter and steam wand gently. Forcing components can stress and damage seals.
Conclusion
A leaking espresso machine doesn’t have to spell disaster for your morning coffee. By systematically identifying the source of the leak, gathering the right tools, and carefully following the appropriate repair steps, you can often fix the problem yourself. Remember that routine maintenance, particularly regular descaling and timely gasket replacement, is your most powerful tool in preventing future leaks. Taking a proactive approach to caring for your espresso machine ensures it continues to deliver perfect, leak-free shots for years to come. What simple maintenance step will you take today to extend the life of your machine?
Frequently Asked Questions
Why is my espresso machine leaking from the bottom?
Leaks from the bottom are often caused by an overfilled drip tray, a cracked water tank, a worn-out water tank seal (O-ring), or a disconnected or cracked internal hose. Start by checking the drip tray and water tank first.
How often should I replace the group head gasket?
For most home espresso machines, it’s recommended to replace the group head gasket every 6 to 12 months. Heavy users or commercial machines might require replacement every 3-6 months due to increased wear from heat and pressure cycles.
Can I use vinegar to descale my espresso machine?
While vinegar is an acid, it’s generally not recommended for descaling espresso machines unless explicitly approved by the manufacturer. Vinegar can be too aggressive for internal brass and copper components and may damage seals, leading to more problems. Always use a dedicated Espresso Machine descaling solution.
What should I do if my steam wand keeps dripping?
A dripping steam wand typically indicates either scale buildup inside the steam valve preventing it from closing fully, a clogged steam tip, or worn internal O-rings/gaskets. Try cleaning the steam tip and then performing a full descaling cycle. If the issue persists, you may need to replace the internal seals.
Is some water around the drip tray normal?
Yes, some water around the drip tray can be normal. Many machines release pressure or backflush excess water into the drip tray after brewing or steaming. However, if the water accumulation is excessive, occurs when the machine is off, or is accompanied by other symptoms, it likely indicates a genuine leak.